Most hikers don’t need a separate sleep setup for every season. What you want is a 3‑season core system that can flex from cool spring nights to late‑fall frosts with a few smart tweaks.
The Goal: One System, Many Trips
This blueprint breaks down proven configurations that actually work on trail, with real weights, price tiers, and when each setup makes sense.
Step 1: Pick Your Temperature Target
For 3‑season backpacking, you’re usually dealing with lows from 20–45°F (-6–7°C). Start by defining your bottom end.
- Mild climate hikers (Appalachians low elevation, PNW summers): Plan for 30°F lows.
- Mountain hikers (Rockies, Sierra, Cascades shoulder season): Plan for 20°F lows.
Then apply this rule:
> Take the lowest temp you realistically expect and choose a bag or quilt rated 10°F lower if you’re average, 20°F lower if you run cold.
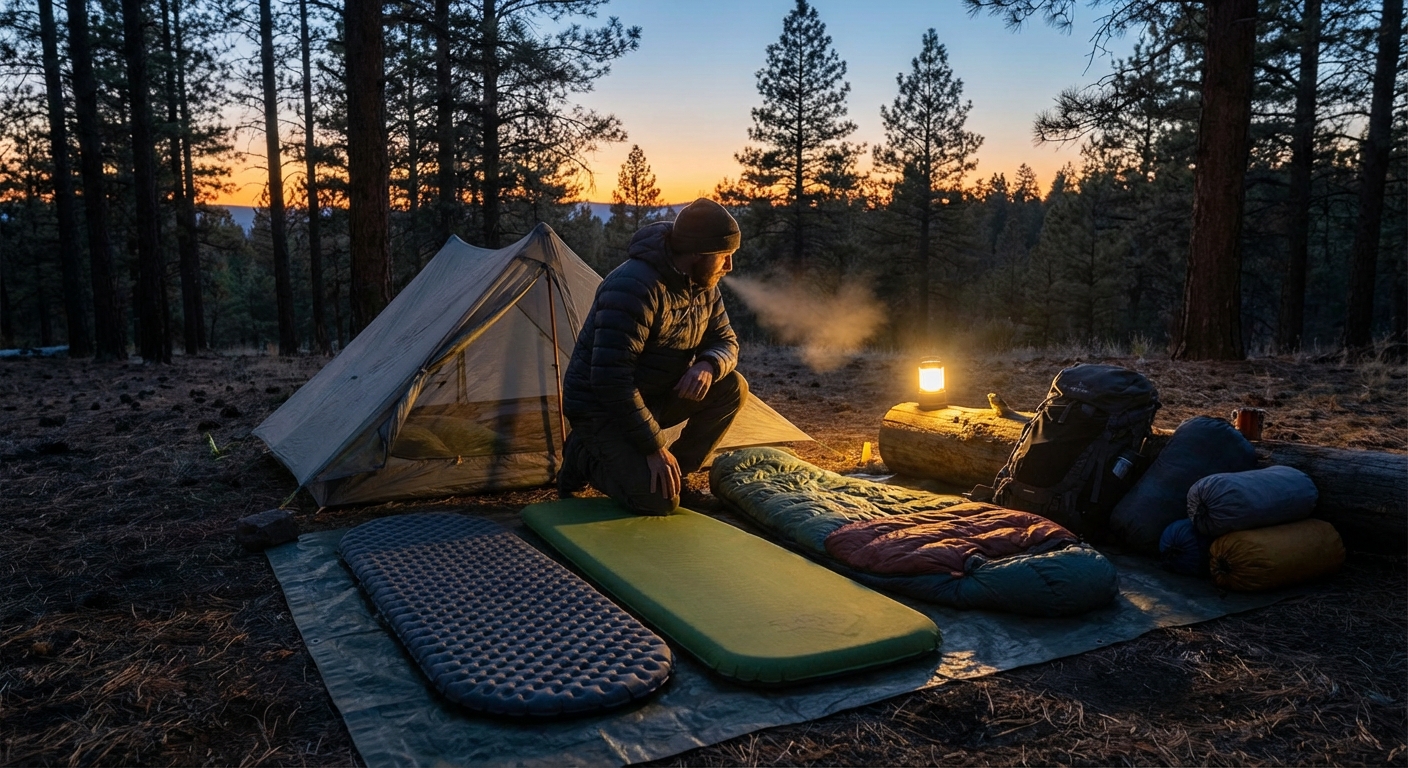
Step 2: Choose a Sleep System Archetype
Archetype A: Rugged & Forgiving (Beginner-Friendly)
Who it’s for: New backpackers, wet climates, weekend warriors who don’t obsess over ounces.
Core pieces:
- Bag: 20–30°F synthetic mummy bag
- Weight: 2.8–3.5 lb
- Cost: $120–$220
- Examples: Kelty Cosmic Synthetic, Marmot Trestles, Mountain Hardwear Lamina
- Pad: Insulated air pad, R 3–4
- Weight: 15–22 oz
- Cost: $120–$200
- Examples: Therm-a-Rest Trail Pro, NEMO Tensor Insulated
- Handles moisture and user error better
- Cheaper to replace and lend to friends
- Warm enough for most 3‑season use
- Heavy and bulky
- Less appealing for long mileage days
Pros:
Cons:
This is your work truck setup. Not pretty, not light, but dependable.
Archetype B: 3-Season Workhorse (Most Hikers, Most Trips)
Who it’s for: Regular backpackers, section hikers, those willing to pay for real performance but not chasing extreme ultralight.
Core pieces:
- Bag or Quilt: 20°F down
- Weight: 1.8–2.4 lb
- Cost: $300–$500
- Examples bags: REI Magma 15/30, NEMO Riff 15
- Examples quilts: Enlightened Equipment Revelation 20, Hammock Gear Economy 20
- Pad: High‑quality insulated air pad, R 3–4
- Weight: 12–17 oz
- Cost: $180–$250
- Examples: Therm-a-Rest NeoAir XLite NXT, Big Agnes Rapide SL
- Huge comfort and warmth for the weight
- Packs small, freeing space in your pack
- Versatile across shoulder seasons
- Needs more care (especially down bags)
- Price stings up front
Pros:
Cons:
Most experienced hikers settle here and stop thinking about upgrades for years.
Archetype C: Thru-Hiker & Ultralight
Who it’s for: Long‑distance hikers counting grams, hikers who know their limits and conditions.
Core pieces:
- Quilt: 20–30°F premium down quilt
- Weight: 16–22 oz
- Cost: $350–$550
- Examples: Katabatic Gear Sawatch/Flex, Enlightened Equipment Enigma 20 (950 FP)
- Pad: Ultralight insulated air pad R 3+ or torso-length pad + foam
- Weight: 8–14 oz total
- Cost: $180–$260
- Examples: Therm-a-Rest UberLite (milder temps), XLite NXT Small + foam, Sea to Summit Ether Light XT Insulated
- Stupid-light for the warmth
- Fast to pack and deploy daily
- Less forgiving in shoulder-season cold
- Demands strict moisture management and careful site selection
- Pad failure can ruin your night
Pros:
Cons:
This is a tool, not a toy. It’s powerful but punishes sloppy habits.
Step 3: Layering Your Way Through the Seasons
Once you lock in one of the archetypes above, you tune for actual conditions with layers and small add‑ons, not by buying three different bags.
Warm Night Configuration (Lows ~40–50°F)
- Bag/quilt partially unzipped or used as a blanket
- Light base layer only
- Pad alone, no foam underlayer
- Vent tent or tarp aggressively
Shoulder Season Configuration (Lows ~25–35°F)
- Bag/quilt fully sealed, collar snugged
- Dry thermal base layers, warm socks
- Light beanie or hood up
- Hot drink and snack before bed
Borderline Freezing Setup (Lows ~15–25°F)
- Sleep in your puffy (jacket and light pants if you have them)
- Add a foam pad under your inflatable (Z Lite, Switchback, generic CCF)
- Extra R 1.5–2, plus backup if the air pad leaks
- Draft collar cinched, neck and head well covered
- Use a hot water bottle at feet
This approach lets a 20°F bag or quilt punch above its weight when needed.
Step 4: Don’t Let the R-Value Sink You
Plenty of hikers own good bags but freeze anyway because they cheaped out on a pad.
Minimum R‑values for 3‑season:
- Mild 3‑season (lows ~35–45°F): R 2.5+
- Standard 3‑season (lows ~25–35°F): R 3–4
- Aggressive shoulder-season trips (lows ~15–25°F): R 4–5 (combined foam + air)
If you’re on a budget, buy a decent pad first. A cheaper bag plus proper ground insulation will beat a premium bag on a flimsy pad every time.
Step 5: Price Tiers for the Whole System
Budget 3-Season Kit (~$250–$350)
- Synthetic 20–30°F bag (~$150)
- R 3 insulated pad (~$120) or R 2 pad + cheap foam (~$70 + $30)
- Simple stuff sack / dry bag (~$20)
Best for new hikers who want solid performance without crying if gear gets trashed.
Mid-Range 3-Season Kit (~$500–$750)
- 20°F down bag or quilt (~$300–$450)
- High-quality R 3–4 pad (~$200)
- Dedicated dry bag + lightweight pillow (~$60–$100)
Sweet spot for comfort, weight, and durability.
Premium / Thru-Hike Kit ($800+)
- 20°F premium down quilt (~$450–$550)
- Ultralight insulated pad or pad combo (~$200–$260)
- High-end compression / dry storage, small luxuries (~$100+)
Upfront sting, long-term payoff for heavy users.
Step 6: Durability and Field Care
Bags & Quilts
- Protect from moisture. Always use a pack liner or dedicated dry bag.
- Air out whenever you can. Sun and breeze drive off moisture from your breath and sweat.
- Use a liner or base layers. Keeps body oils out of the insulation and extends wash intervals.
Pads
- Always clear the ground. Pine cones, goatheads, sharp gravel—brush it all away.
- Use a groundsheet. Especially under air pads in floorless shelters.
- Carry a patch kit. Use it the moment you notice a leak.
Closed‑cell foam pads are nearly bombproof; inflatable pads are not. Plan accordingly.
Step 7: When to Swap vs When to Adapt
You don’t need to buy a new bag because a forecast looks 5–10°F colder than you like.
Adapt first:
- Add a foam pad
- Sleep in your insulating layers
- Use a hot bottle and pick a sheltered camp
- You’re repeatedly pushing your system 15–20°F beyond its rating
- You’re moving from dry mountains to chronically wet coastal regions
- Your insulation has clearly lost loft or your pad is more patch than pad
Swap gear when:
Closing: Build for Reality, Not Instagram
A good 3‑season sleep system doesn’t chase the lightest spreadsheet number. It’s built for the kind of trails you actually hike, the weather you actually see, and the way you sleep.
Lock in one of the archetypes above, tune it with layers and smart pad choices, and you’ll have a system that carries you from April frosts to October leaf-fall without drama.